
Projection Mapping Tutorial
NOTE THIS PAGE IS CURRENTLY UNDER CONSTRUCTION

What equipment do I need for projection mapping?
The most challenging part of projection mapping and digital decorations is the very beginning. It seems very complex, expensive and impossible to begin but the reality is that its not that daunting once you begin and quickly understand the process, below are the requirements to get things up and running.
Requirements to map your house:
-
Projector
-
HDMI Cable
-
Software download from here
-
Laptop with a full HD display (you will see how to know this in the how to section below)
-
Location where to mount your projector.
-
Long Power Cable
Requirements after mapping your house:
-
Projector
-
HDMI Cable
-
Laptop or Media Player
-
Speakers / FM Transmitter
-
Enclosure or Stand
-
Power Cable

How do i make a map of my house?
So now we have all the equipment required the big question remains how do we projection map my house? Well below we have our simple to follow step by step guide so lets go!
Software Installation
Before we begin lets first install the Free mapping software, this software is sourced from Digital Press Works, the original author isn't listed within the program to credit. It is Compatible with Windows 7/8/10 & 11.
If you haven't downloaded from the above link, you can click here to download.
-
double click 'projectionmapper.zip within your downloads folder.

2. double click 'projectionmappersetup.exe'
3. When prompted with 'Do you allow this App to make unauthorized changes' click Yes
(Note at this stage some machines may ask to install .NET Framework, please go ahead and click Install as this software will not function without it)
4.Tick the Box which says Create Desktop Shortcut then click Next

5. Click Next again
6. untick the box which says Launch Projection Mapper. (we will open this later)

Congratulations you have now installed the software.
Step 1 : Preparation
Before we start connecting our laptop device our first job is to find a location on your property suitable to cover the areas you wish to cover.
Mufasa in the Lion King says "Everything the light touches is our kingdom", keep that thought in your mind as that's exactly what we need to achieve here.
We first need to find a location for your projector, we do this by attaching a long power cable to your projector and turn it on. Your projector will now be displaying its default screen and we use this light to freely move around your property to find a good location where we project light covering the house.
Once you have discovered this location then its time to create a home for your projector. now we need to make sure the location where the projector is going to live is marked exactly - after you have created your map the projector needs to go in the exact same location (this includes height & position)
Step 2 : Connect to laptop
Now we have found the location for your projector its time to start connecting things to our laptop in preparation to create the projection map, place your laptop in a position where you are comfortable enough and able to connect your cable.
-
Connect HDMI Cable to Projector
-
Connect HDMI Cable to Laptop
You should now see your laptop screen appear on your projection screen (if not please refer to your projector manual and discover how to change 'source', you will need to change this to the input on your projector that your laptop is plugged in to)
Step 3: Configuring your laptop and projector
Now you have successfully connected your laptop to your projector we now need to make sure you have the resolution set correctly.
There are 2 different methods for this step on Windows 11 & Windows 10, please refer to the correct one (if your unsure you will be able judge from the screenshots below):
Windows 11:
-
Right click on your desktop (this is the main screen with all your icons)
-
Click 'Display Settings'
-
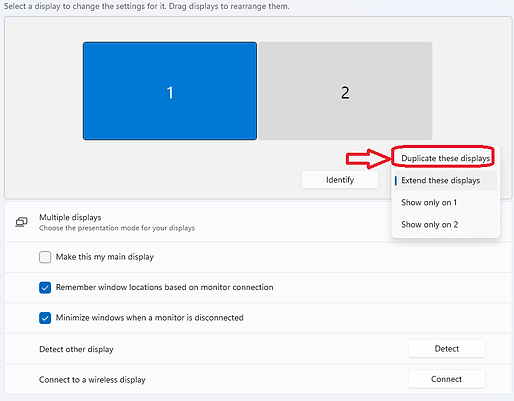
Click the option next to the to the word Identify as shown below and select Duplicate these Screens.
5. Scroll Down the same window and locate 'Display Resolution' - click the box next to the right of this (this number may differ from the numbers shown in the screen shot below)
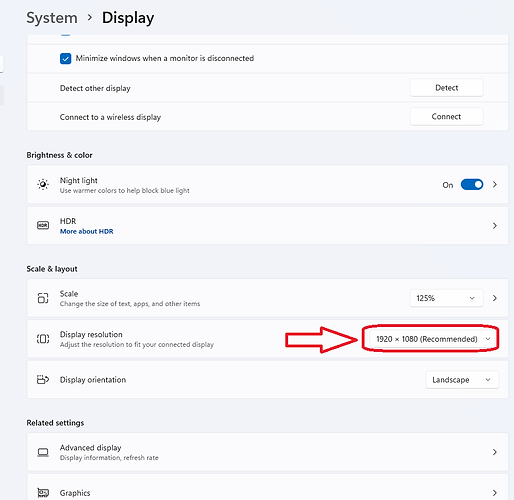
6. Select 1920 x 1080 (If this option doesn't appear please view our alternative method here)

7. To Confirm the resolution is correct on the projector and laptop screen, we do this by scrolling back to the top of the page Select Screen 1 -> Scroll back down to Display Resolution and confirm the number says 1920x1080, we then repeat this process by clicking number 2 and checking again for 1920 x 1080


Once you have confirmed both match, we can now proceed to mapping.
Step 4: Mapping your House
Now its Time to map our house, but first you just need to make a quick final check before proceeding to draw around your house, to do this just follow the steps:
-
Double click the file 'projectionmapper.exe' from your desktop

2. You now should have a complete White Screen, all you need to do at this stage is click and drag anywhere on the white screen to drag a single line. You then Right click anywhere on the screen and click Save As

3. Click where it says Desktop and type in Test Map in to the File Name and Click Save

4. Right Click the White Screen again and this time select Quit.

5. Head back to your desktop (where all the icons are) and locate the file 'test map.png' and Right click on this file and click 'properties'.

6. Now on the Window that has opened select 'details' and look below image - the dimension should read 1920 x 1080

7. Providing the above is correct and the dimensions are showing as 1920x1080 you are now ready to map your house!
To Do this reopen 'projectionmapper.exe' and you will now have the white screen again, this time look at your house as you draw the lines and you want to click and drag a line over every area possible, this includes house outline, windows, window frames, garage doors, fences - you can look down on your laptop screen at any point to see how you are progressing. (if you make a mistake you can Right click at any point and Click Undo.

8. Once Complete you can now Right Click on your projection map and click Save As and input your file name.
CONGRATULATIONS YOU NOW HAVE A PROJECTION MAP
How do i display one of your shows on my house?
To display one of Jester Laughs shows its really quite simple once you have completed the above step or produced a map from another provider, all you need to do is place your order and send over your map to our email address contact@jesterlaughs.com - once we have produced your first show then you don't need to worry about sending over the map again, you can just place your order.
Once we have customized your order to your map, all you simply need to do is play it.